Stamp it out

This project was inspired by my friends obsession with mustaches. He had sent me this link to a pinterest pin. I wanted to try it, and randomly give it to him as a surprise. (Because I never commented on the fact that he sent it to me). It seems simple enough, and I never thought of making a stamp out of an eraser before until now. It all makes sense now.

Things needed for this project:

  1. Pen
  2. Eraser (Try to use a smooth pink one, my white on had bumps and wasn’t as good)
  3. Either a Knife or box cutter (or the fancy knife in the link)
  4. Stamp ink (which I didn’t have. =/)

IMG_20130506_001200

First draw you r design on the eraser in pen, it doesn’t have to be a mustache. (Sorry drawing is not my forte)

IMG_20130506_001401

With your drawing outline the pen, with the knife you decided to use. It was a little hard to do with a box cutter but manageable.

IMG_20130506_001521

Start peeling away the other layers, using your knife to help you along the way. You want to make sure that the design is high enough away from the rest of the eraser.

IMG_20130506_001952

Next put the stamp eraser in the ink pad and stamp away. I had to use paint, because I forgot I would need ink.  Though the paint did not come out to bad with the stamp, but it could be better.

IMG_20130506_002252IMG_20130506_002306IMG_20130506_002354IMG_20130506_002359

Things to remember when doing this project:

  • Do not get an eraser with ridges on its face, or bumps. This will affect the outcome of the stamp.
  • The fancy knife in the original is probably better to use than a box cutter, but if you don’t have one then the next best thing works. (As we have seen)

Overall, this project is definitely worth the time and money. Especially when stamps can cost a couple of bucks each. Plus you will always have the one you are looking for now. It’s a fun quick little project, which can be done with things already around the house. This project also challenges you to see what you can make into a stamp. I was unoriginal, and stuck with the standard. What can you do? Get back to me.

Until next time,

Emily

Hawkeye’s training wheels

This project was inspired by my pure obsession for archery, and Hawkeye from the avengers. I found the functioning crossbow picture somewhere on the internet. I do not remember how I came across it, but I wanted to try it. I mean why not, you can annoy your housemates with it, and it costs less than a Nerf gun. How much better can it get? So while this might not exactly be a children’s toy, who says they are the only ones who can have fun.

Things needed for this project.

  1. 6 pencils (5 un-sharpened, and the last can be either sharpened or un-sharpened)
  2. Binder clip
  3. A bunch of rubber bands (because you will break a few)
  4. 4 push pins
  5. Paper clips

IMG_20130505_234426

First, put all four pencils together in a little square. Then put the paper clip in between the two rows of two. (Put it a little further down, than it is in the picture)

IMG_20130505_234756

Next put four rubber bands on the stack of pencils, like show in the picture to hold the pencils in place.

IMG_20130505_234846

Because the original picture is vague I modified it to what works, so before you put the rubber bands on by the “tip” of the pencils add in another paper clip like you did by the erasers. Then put the rubber bands before and after the paper clip like at the top. Also for added stability I stuck a push pin into the pencils on either side of the push pin.

IMG_20130506_000740

Then take the 5th un-sharpened pencil and one of your most stretchy rubber bands an put it around the pencil. Next stick a push pin in the rubber band and the eraser. Do the same for the opposite side although it might be a little tough. Next, clip the binder clip to the pencil and one side of the rubber band.

IMG_20130506_000055

Add this to the stack of four pencils by using the binder clip to clip onto the 2 push pins and paperclip. Then you have a finished product. The last thing you need to do is thread the last pencil through the binder clip (eraser facing out) and then use the free end of the rubber band as the bow string. And you are set to hunt some aliens like Hawk eye.

IMG_20130506_000632IMG_20130506_000828

Things to remember when doing this project:

  • Never put the sharp end on a pencil in the crossbow facing outward. You can take someone’s eye out. (actually)
  • The push pins are a little hard to get into the pencils, so use a hard object as a hammer.
  • Some of these pencils will never be able to write again, keep that in mind.
  • The cross bow shoots the pencil pretty far, so watch out!

Overall, this project was a huge success. It took me some time to get it to work because I was working off of a picture. Otherwise it was smooth sailing. Now I don’t have to buy a Nerf gun and I can still ambush my housemates (and sister). This project was a lot of fun to make and a lot of fun to play with after the fact. I would recommend it to any of my friends. Go forth and pretend you are Hawkeye, or green arrow. (Who doesn’t want to be a super hero?)

Until Next time,

Emily

Super Heroes and Money Holders

The inspiration behind this project was pretty simple. Over the summer my sister and I had been reading a lot of comics. The store near my house would sell a 3 pack of really old comics for a dollar, so we would occasionally go and get the good ones. When you have a three pack you can’t see what’s in the middle of the packet, so we ended up with a lot of useless no name or brand comics. We decided to do something with them instead of throwing them out. My sister was the lead mind on this project, and she doesn’t remember the various links on YouTube where she learned the art of comic book wallet making. Because we made these during the summer, we used half a page in the school newspaper to demonstrate the folds you would need to make in your comic book.

Things needed for this project:

  1. Comic book (or newspaper/paper)
  2. Duct tape

First you take out one full page in your comic book. The left and right sides (if you want it to be thicker, then take a couple of pages out and act like it is one single page). If you are using a newspaper cut your page above the fold, and then fold it in half.

IMG_20130506_003245

Next, Take the left side and fold it to the center or seam of the page.

IMG_20130506_003301

Do the same for the right side.

IMG_20130506_003324

Then with both sides tucked in, fold it over again. This leaves you with a long rectangle piece.

IMG_20130506_003341

Take the rectangle piece and fold that in half again. This is going to be the size of your wallet.

IMG_20130506_003351

Now you want the wallet to stay so take out some duct tape and tape the first side.

IMG_20130506_003601

Cut another piece of duct tape and tape the other side closed as well.

IMG_20130506_003611IMG_20130506_003617

This creates the bill section of the wallet.

IMG_20130506_003628

Now if you want a card pocket open the wallet and within the seam cut two triangles through only one layer of the paper. This can be difficult because the paper is so thin in one layer. The only bad thing with pockets in comic book wallets is that because it is made of paper if you take your cards out a lot it rips. It rips cause of the constant in and out.

IMG_20130506_002903

Here are pictures of the wallets we made over the summer.

IMG_20130506_002941IMG_20130506_002929IMG_20130506_002917IMG_20130506_002912IMG_20130506_002903IMG_20130506_002851IMG_20130506_002841IMG_20130506_002833

Things to remember when doing this project:

  • Make that the desired design is on the outside. The paper can be refolded if it’s not on the side you originally wanted
  • You don’t have to just duct tape the sides, the ones we did over the summer had duct tape on all sides so it was even.
  • Read the comic book before tearing it apart! It might be good, you never know!
  • The Glossy paper and covers are made with stronger material so those are the better pages to use.

Overall, this project is worth the time and effort. It’s pretty effortless, and once you get the hang of it does not take too much time to complete. It’s fun to do with friends, and although you might not want to use this wallet every day of the year, sometimes you just need a little fun and flare in your life. Try out the wallet project and let me know how yours came out! Have a blast!

Until next time,

Emily

Rags to Fab

This post was suggested by my housemate Dori. She had been dying to try this DIY Shirt project for a while now, and I told her I would document it and put it on my blog. My housemate is super skinny, so whenever she gets free shirts they are always super large on her. She wanted to have a way to make them smaller and cute without a lot of effort. She found a big shirt, and a video of something she thought would work.

Thing needed for this project:

  1. Large Shirt
  2. Scissors

IMG_20130427_230619

First you have to fold the shirt in half, but make sure that the front of the sure is not folded with the back of the shirt.(Its hard to see in the picture)

IMG_20130427_230613

Next you cut off the bottom seam of the shirt

IMG_20130427_230712IMG_20130427_230727IMG_20130427_230734

Then you cut a bunch of one inch slits in the back of the shirt, to the bottom of the shirt. The first one has to be the longest one.

IMG_20130427_230850 IMG_20130427_230932IMG_20130427_230940IMG_20130427_231008IMG_20130427_231012IMG_20130427_231637IMG_20130427_231645

Then you open up the shirt with the back facing up, and stretch the slits that you just cut.

IMG_20130427_231723IMG_20130427_231834

Now, cut the slits in half

IMG_20130427_232333IMG_20130427_232400IMG_20130427_232406

And tie them back together in a knot, to make the shirt tighter.

IMG_20130427_232516

This is the finished product.

IMG_20130427_233242IMG_20130427_233252IMG_20130427_234438IMG_20130427_234429

Overall, this project was a slight bust. While the shirt came out how it did on the video, my friend was not as satisfied with the result. The shirt on the back had a cape like thing that looks weird in person. While it did make it smaller and cuter than it did before, she did not like the top of the back. Therefore, she decided that this project might not be worth the time. It did not cost anything, but she said she would rather just wear the bigger shirt. Although if you want to try it go ahead! It was a fun experience, although I’m not sure who would want a weird cape thing on your shirt. (Unless it’s Halloween) So, while it does make the shirt smaller and more interesting, it is not exactly attractive.

Until next time,

Emily

Upcycled Storage

This project idea was not only inspired by this pinterest pin, but also by my friend and fellow college RA Naomi. She had done it for her RA program and thought it should be featured on my blog, so I decide to try it for myself. Also I thought it would be cute to give a new teacher, and paint it to look like an apple!

Things you need for this project:

  1. Two empty soda bottles
  2. Hot glue gun
  3. At least 2 zippers from a crafts store
  4. Scissors (depending on how sharp your scissors are you might need another sharp object)

13675364676761367536474393

The first thing you have to do is cut the bottles to the sizes you want the box to be. I cut them in half first because my scissors weren’t too sharp so it was easier to work with this way. I ended up having to use the box cutter from the eternal rose post to make the first cut in the plastic.

1367536842135

Then I cut it down with scissors to the sizes I need for the top and bottom. (Although somehow one became shorter than the other)

13675370247811367537300614

Now it’s time to use the hot glue gun. (I had never used one before)

1367537460942

Then you glue the zipper to the bottle, do the bottom first. (Because of how short the zippers were I needed to use ½ of a second zipper. I would measure it out before you glue it to make sure that you have enough zippers to bottle ratio. I glued them on the inside of the bottle, but after talking to my friend Naomi she said that it is easier to glue it to the outside. This is because when the zipper is on the inside it sometimes gets caught on the bottle. (There are no pictures of me physically gluing it because i needed both hands to complete the task)

1367538485044

This is what the end result looked like. You can see the glue on mine because I did not know how quickly hot glue cools down.

13675385328551367538540892

Things to remember while doing this project:

  1. Hot Glue IS VERY HOT. Try to avoid burning yourself, and do not touch it. (I’m a derp sometimes)
  2. Glue zipper on the outside for smoother access.
  3. The evenness of the bottoms of the soda bottles don’t matter as much as I originally thought it would.

Overall, this project has a lot of potential, especially if you are more experienced with a hot glue gun than I am. The total cost of the project is pretty low. I purchased the soda for a $1 each. Then the zippers and Hot glue gun was given to me by my friend Naomi because she had extras. This project is totally worth it because it only took a couple of minutes to do. It can be used for a lot of different things as well. End of the year gifts for your kid’s teachers, graduates going into teaching, and party favors. Who doesn’t need an upcyced bottle box?  I would recommend you try this project out. My house has had a lot of fun with it. (Two of them are prospective teachers). This project is a total go!

Until Next Time,

Emily

Eternal Rose

This project was inspired by the honorary band sorority I am in. Our flower is the red rose, and at the induction of new members they get roses, and rose related things. I wanted to give some of them something unique and making my own roses from duct tape seemed like something fun to experiment with. I also made them with pens for my uncle’s organization caritas internationalis, because he liked the idea so much. This is also a fairly simple process, but it is also very easy to mess up. I have done these many times over and have gotten it down to a science.

Things you will need:

  • At least 1 roll of duct tape, any brand works well enough, although I have found that some colors of the Duck brand are not as sticky. The more colors the merrier.
  • Unused Cheap wooden Chopsticks from takeout or a pen. Basically any stick like object you desire.
  • Cutting board
  • Exacto Knife or a box cutter
  • Patience

13675337363551367533745977

First, you take the chopsticks (I used TWO pairs to make it thicker) and you put them together, one on top of the other. Next on the cutting board lay down a chopstick to measure out how much tape you need to cover it and cut it at that length, a little extra at the top or bottom doesn’t hurt.

13675338848741367533965843

Then, you put the chopsticks on the tape and you wrap it up as if you would wrap a present.

13675340105971367534041239

Here is where you would cut off any excess tape.

1367534086252

Next, get three strips of tape across the cutting board as long as you can make them, I suggest cutting the ends with the Exacto knife or box cutter to get an more even cut.

1367534193291

Here you want to cut smaller pieces from the bigger pieces of tape. About 4 inches, but if they are smaller or larger it is not a big deal. Do this to all three pieces of tape.

1367534257140

This is what the standard size should look like. I get about 6 or 7 pieces per strip with my cutting board.

1367534315221

Next, take the tape and fold down the top corners into a little triangle like so.

1367534336295

Place is on the chopsticks stem, and wrap the sticky part around to keep it in place.

13675343539581367534367141

Keep doing this, there is no specific order on how to place them but to keep it even try to fill in all of the spaces in-between each “petal”.

1367534394566

This is what mine looked like after the first row of tape.

1367534565702

Keep filling in the spaces.

1367534569502

This is the progress after all three rows

136753479267213675347981851367534803408

Then, you do 3 more rows of tape and cut them to the same sizes as before.

1367534961775

Layer the tape some more and this is what it looks like after the 6 strips of tape.

136753545430813675354648311367535480084

I usually do 3 more strips of tape because I like how the 9 strips of tape looks with fullness of the flower, but you can stop whenever you feel like your flower is done. So, here are the last three strips of tape.

1367535609674

And the finished product!

1367536029035136753603506413675360395161367536048638

Because I don’t like how uneven it looks from the various layers of tape to the stem I always cut two more pieces of tape and cover it up.

1367536087765

I just wrap it around the bottom of the flower to make it a little neater.

1367536114393

Here are some pictures of the pens, and various other roses I have made in different colors.

1367533771655136753377764613675337854561367533790678136753380816013675361615181367536167091136754810857013675481151261367548119636136754812470913675481309481367548134032

Some things to remember when doing this project:

  1. The fullness of the rose is based on how many pieces of tape you use, if you are satisfied with how it looks then you don’t need anymore.
  2. While it looks like it might go quickly, it would be better if you took your time and methodically placed each piece of tape. Cause the tape can be dispersed unevenly and it will look weird.
  3. Get crazy with the colors! (or don’t, you don’t always have to listen to me)
  4. Be careful with the knife you use to cut the tape, I have done this a variety of ways and have found that this is the easiest method. Originally I was just ripping the tape right from the role, but then nothing is consistent.

Overall I think this project is great. It can be used for various different occasions, and has different uses. You can just make them as roses or pens. They can be party favors for little girls (Beauty and the Beast anyone?)  Or if you just enjoy making things out of duct tape then this project is for you. The costs are pretty low, depending on what type of duct tape you buy. For this project I had stuff left over from the summer. Some dollar store duct tapes are great and some aren’t, so experiment. I have used Duck brand, Scott brand, and dollar store brand duct tapes and they all work well enough. It’s fun to watch your roses bloom from a stick to this colorful outcome.

Have fun! And make something colorful for spring!

Until Next Time,

Emily

P.S. I was using rainbow tape in this post because a friend asked me to make one with it for her. I wasn’t sure how it was going to come out, but I was really happy with the color combination.

Expressive Coffee

The inspiration behind this project is more selfish than the other projects have been. I have always wanted one of  those mugs that have quotes on them, or the ones that have Harry Potter related quotes on them (because who doesn’t like Harry Potter). But, I never want to shell out the $20 or more for just a mug. So when I saw this on pinterest and I couldn’t pass up the opportunity to try it. This is where I found the instructions for the mug project. It is one of the simplest projects I have done so far.

Things needed:

  • Mug (I used an orange mug from rite aid, and also a white mug we had in the house)
  • Sharpies ( Used a black standard one, and some colored ones)
  • Oven set to 350⁰
  • Some sort of timer (I used the alarm feature on my phone)

IMG_20130423_175702IMG_20130427_213310IMG_20130423_175734IMG_20130429_013215

First thing to do is to make sure that your mug is clean, and free of any kind of debris (like a sticker). Then you choose the quote or saying you want to write, and write it on the mug using the sharpie.

IMG_20130423_175633IMG_20130423_175646IMG_20130423_175653

Once you are satisfied with how it looks put it in the oven at 350 degrees, and set a timer for 30 minutes. I put it on a cookie sheet to avoid any mishaps.

IMG_20130423_175723

After 30 minutes you take it out and let it cool. Don’t touch it or you will burn yourself. I let the mugs cool for at least another half hour. Then you are free to use your mug.

IMG_20130423_182900IMG_20130427_234046

Ready to use!

13667625421141366762518662IMG_20130428_140738

Here are picture of the white mug after its was baked in the oven.

IMG_20130427_234901IMG_20130427_234914IMG_20130427_234931IMG_20130427_234935

As you can see the always on the handle smudged off, even after spending 30 minutes in the oven. I think it had something to do with the colored sharpies I used, because they were chisel tipped and the black sharpie was just a regular one.

Some things to remember about your quote mug for long lasting use.

  • I would not put it in the dishwasher. I put the orange mug in the dishwasher to test it, and at first glance it looks fine. But with further inspection some of the sharpie had chipped off.
  • Do not write on the handle, for whatever reason the handle did not hold the sharpie well even after baked.
  • The Colored Sharpie I used did not work well on the mugs, but the black one worked fine. So if you want to check out the colored ones I would use the normal type. These are the colored ones I used, try to avoid these.
  • IMG_20130429_013215

Overall, I would say this project is worth your time because of the low cost. Mugs are a few dollars or a dollar if you get them at the dollar store; and sharpies are also a pretty low cost item. Most of the time you can find Sharpies around the house. Unlike my prediction the color of the mug does not change the result of the outcome, which is exciting because it can add a little flare to your finished product. I would stay away from the Colored Sharpies that I used, but if you want to try it on your own let me know if it works for you! I would totally do this again, it’s a fun experience and easy to do with large groups. Plus, now you can have an awesome mug without the guilt of spending $20 on it.

Until Next Time

Emily.

Chalk Zone

Welcome back, today we are going to discover the wonder of Chalk board paint! (and how to make it yourself for half the price.) Who doesn’t love chalk, I know a number of people who wanted to be teachers in elementary school (including myself) because they got to write on the board. Gladly we have all moved forwarded, and realized that there is more to a job than Chalk. Nonetheless, it is still fun to use even on other surfaces. I originally found this idea on pinterest, what a surprise. The pin linked to Attempting Aloha’s blog.  So there is my original source. This was not the only thing that led me to do this project.  My cousin also inspired this post; he has a 5 year old son who loves to draw and had been drawing on his walls. So, to encourage the drawing but refrain from the ruin of his walls they purchased the chalk-board paint for his room. Then painted the bottom half of his walls. It was pretty neat, and honestly I was slightly jealous. Who wouldn’t want a chalkboard room as a kid? So I decided to try the cost effective version and see if it was worthy.

IMG_20130423_180351

Things you will need for this project:

  • Some type of surface, I used a serving tray I purchased at rite aid for $3
  • Non-sanded Grout, I got mine at home depot, for around $4 and it is pretty large considering you will only be using a small amount. Maybe consider asking about a smaller size although there were none on the shelf. Or simply go to a local hardware store.
  • Paint Brushes
  • Measuring cups/spoons
  • Mixing cup or dish, I used a takeout container
  • Acrylic paint. Any color you wish. I had some laying around from another project but they typically cost a couple of cents a piece

IMG_20130423_180356

Be sure when you go to the store to get Non-sanded or Unsanded Grout because there are a couple of different kinds. Here is a close up of mine.

IMG_20130423_180401

The first official step in this project is to measure out a ½ cup of paint. I mixed mostly gray paint, with some blue and black. I also added in some yellow, because I was a little under on the measurement. I got a grayish black color which worked out nicely, but you can use whatever colors you like. I used these because they were already in my house. Then you add 1 Tbsp. of grout. You have to make sure you mix it well, without any bumps or lumps. That way it is evenly distributed throughout the paint. The grout is what gives it that chalk board like texture. You can mix it with a spoon, or the paint brush. I used the brush to limit the amount of things I would have to wash later on.

CAUTION: open and use the grout in a well-ventilated area because it’s a very fine powder. I had no problems but this is my disclaimer.

IMG_20130423_181623

After everything is well mixed you can start to paint, as you can see I was a little heavy with the paint on the brush. If you put less on the brush at a time you can avoid the lines you see on my tray. Let it sit to dry.

IMG_20130423_182847

While it’s drying I would suggest covering the remainder of the paint,  you will need to use it for the back of your surface if you so desire and another coat.

IMG_20130423_182853

Once the front is completely dry, I flipped it over and painted the back of the tray.

IMG_20130423_201631

Once everything was dry I was extremely excited to try this out. I grabbed my chalk and got to work. As you will see in the next few picture, the hardness of the chalk scrapped off some of the paint. I was disappointed, but I started to wonder if it was because what I used was plastic and not wood. Before I gave up I decided to give it one last try. I erased all of the chalk I had on the tray and repainted both the front and the back hoping the extra layer would give it more stability. I wasn’t really expecting anything as a result, but it was worth a try since I had plenty of paint left over from the original ½ a cup.

IMG_20130423_225009

IMG_20130423_225014

IMG_20130423_225027

IMG_20130423_225022

IMG_20130423_225047

IMG_20130423_225036IMG_20130423_225051IMG_20130423_225103IMG_20130423_225056

I let it sit overnight because I wanted to make sure the entire thing was dry before I tried again.

IMG_20130424_085845IMG_20130423_230243

The results were perfect. It worked like a charm after the second coat.

IMG_20130424_090205IMG_20130424_090412

This project is totally worth, your time, money and efforts. Not only will it provide a fun experience during use, it was also fun to create. Mixing colors, and just painting and getting dirty in general are great stress relievers.

These are some things you should remember before attempting this on your own.

  1. Use two layers of paint if you are painting a plastic surface.
  2. Don’t wear anything nice, because the paint will stain your clothing
  3. Consider how much you are going to paint because the 1/2 cup suggested gave me enough to coat the tray completely 2 times, and I still have some left over.
  4. HAVE FUN!

It’s Like Magic!

Not only is this a worthy experience because it works and it’s fun.  But, it’s extremely cost effective I spent a total of $7 on the whole project, with supplies left to spare. Whereas a small can of chalkboard paint at the store costs at least $14. I would recommend this project to anyone who enjoys a little fun now and again.

Until Next Time,

Emily

Fun with Fruit!

Hello again, today I am going to report my findings on The Clementine/orange natural Candle. I first saw this idea on pinterest, and since there are so many different pins of this one project I am not going to link any specific one to this blog post. I have done this particular project a couple of times in the last year hoping that with each new try it will get better. The thought of this cute little mini orange candle is too tempting. Oranges are great, and who wants to pay retail price for a candle when it’s that simple to do at home, right? Is it worth the effort?

I’ll walk you through my most recent attempt at the clementine candle. This is the brand of clementines I used, for no particular reason. These are the ones my sister picked up at the store, so they were in the house already.

IMG_20130421_215347  IMG_20130421_215324             

Things you will need:

  • A Few Clementines (Mandarin oranges would also work)
  • Knife
  • olive oil
  • Lighter or matches

First you take the clementine and you make a small slice all the way around the middle. Only cut enough to puncture the skin.

IMG_20130421_220129
Second, once the cut is made using your thumb you carefully pull up the skin to detach it from the fruit. This takes a lot of patience and may or may not work for you on the first try.

IMG_20130421_215533IMG_20130421_215551

There should be space now on both the top and bottom half. Now comes the tricky part. You have to get the both parts of skin off in once piece, as well as to make sure the bottom half has the little white part attached to itself and not the actual fruit. Keeping it attached is by far the hardest part of the whole procedure.

IMG_20130421_215650IMG_20130421_215644IMG_20130421_215657

Here, clearly that little white piece did not stay attached; it was on the fruit part. I pulled it off, so I could show you exactly what it looked like. Although, it would have been nice it if had stayed on. The first time I attempted this I could not get one peel with it still attached.

Let’s see what try number 2 brings!

IMG_20130421_220324

Try 2 was a complete fail in every sense. How about try 3?IMG_20130421_220607 IMG_20130421_220613IMG_20130421_220623IMG_20130421_220631

On try three both half’s cracked in the same spot, but I was determined to make this project work and I did not want to break open another one. 3 Clementines in one sitting was way more than enough for me (and I wasn’t going to throw out good food!).

So I made it work I decided to but the cracked bottom inside the first bottom. The first bottom had a complete skin, and the third bottom had the white wick like piece in perfect condition.

The next step in this project is to pour olive oil into the bottom and let the wick soak. I let it soak for about 3-5 minutes.

IMG_20130421_220801IMG_20130421_220810

While I let that soak, I cut a hole into the top of the third Clementine, to give the smoke a place to escape. The shape of the hole doesn’t matter, it could be anything. I did a simple triangle.

IMG_20130421_220755

After the wick is thoroughly soaked you can light it. I used a regular lighter, but matches or a long BBQ lighter works as well. After holding a flame to the wick for a while it finally did light, although not for long. The flame stayed for barely a minute. Only long enough for me to snap these photos. I was going to shut the light off to show its reflection and how the peel glows but it went out and would not light again.        

IMG_20130421_221303IMG_20130421_221312IMG_20130421_221343

Overall the project does work, but I did not smell that orangey goodness that I was expecting. The only thing I smelt was something burning (the wick), but there was no citrus sent. It was interesting because the peel smelt good by itself.

Considering the outcomes, I do not think this project is worth the time. It looks pretty if you can get a couple of them going. The reasons why this DIY is a bust are a couple of key flaws.

1. It’s very tedious to make sure everything comes out right, for something that doesn’t even smell.

2. Flame variation. There is no telling how long it will stay lit, and there is no guarantee that it will light again for you.

3. It doesn’t even smell. This was a killer for me. Especially after finally getting it lit for the first time in the couple of times I have tried this project. I like candles because they smell nice and look pretty. So to put in the time for something that doesn’t even smell seems pointless to me. I guess if you put flavored or scented oils instead of olive oil it might smell, although most directions just say olive oil.

Generally, I was disappointed in the outcome. I would recommend you skip over this project, unless you like subpar candles and maximum frustrations. (Especially if you are clumsy and you burn or cut yourself) This project was a big flop, but if you still want to try it out for yourself go for it. My sister and I had a couple of laughs over this, especially with attempt number 2.

If you have any questions comment, or email me (my email is in the about me section).

Until next time,

Emily

A Storage bed fit for a full.

It was winter break and having little to do, my mother set me on a mission. The goal: to find a full size bed frame with storage for under $300.

Clearly, this was not very do-able otherwise it would not have been delegated down the line. Having some time on my hands I googled various different items and found myself on pinterest.com in the DIY section. After searching through a great deal of pages, over about a week I came across a novel idea. It was called an ikea hack; I had no idea what it was but understood the concept right away. This couple built a storage bed with a cheap ikea bed frame and wooden storage boxes underneath for legs. (http://blog.jasonlang.me/ikea-hack-storage-bed)

This had me interested, but what I really wanted was step by step directions. Instead I had to deal with pictures and come up with my own measurements. Using this idea I decided that I was going to try a variation on the ikea hack storage bed (with less power tools and more ikea items); and well if it didn’t work then we would have a full size bed frame and two more bookcases for the house. And let be honest, who doesn’t need more book cases?

I started very similar to the couple, by going to ikea and finding the $50 Fjellse bed frame. (Bringing along my dad for some help)  While there we saw these Expedit bookshelf units that looked pretty similar to the boxes used in the other couples project. Being only $60 for one it came to a cheaper total price then the $100 the other couple spent per 5 boxes so total $200 for the 10 needed boxes. The only difference being the Expedit shelf was about 3 inches shorter than the bed frame would be so it wouldn’t be completely flush.

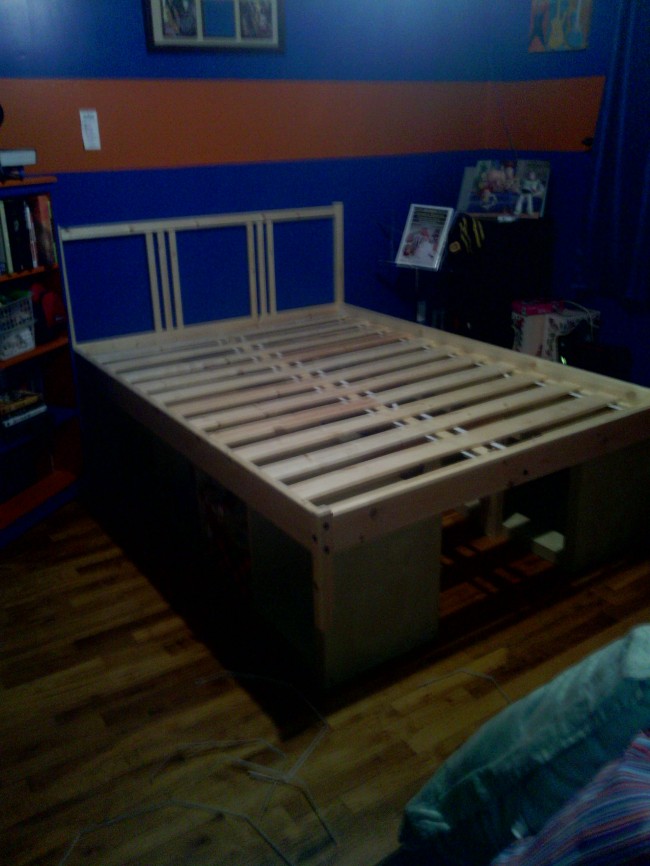
Nonetheless we tried it. First we put together the three items from ikea as their instructions described, and my sister and I maneuvered the frame over the bookcases and set it there for now.

Image

Then we decided if we liked it before we got any more involved or made anymore holes into the pieces. We didn’t want to cut off the legs on the actual frame incase the project did not work so having those couple of inches helped out a little bit.

We needed to figure out how to connect all three pieces; since the other couple had to connect their boxes they did it a little differently. We decided to add bridge like structures underneath connecting the shelf’s and the bed, while adding some support. My dad cut nine pieces of wood from planks he had lying around in the basement. We measured from the floor to the top of the inside of the bed frame, as well as from one shelf to the other for the measurements. Then we connected three pieces to each side of the shelf. Following that we took the last three pieces and connected them to the ones on both sides with screws and a screwdriver gun.

Image

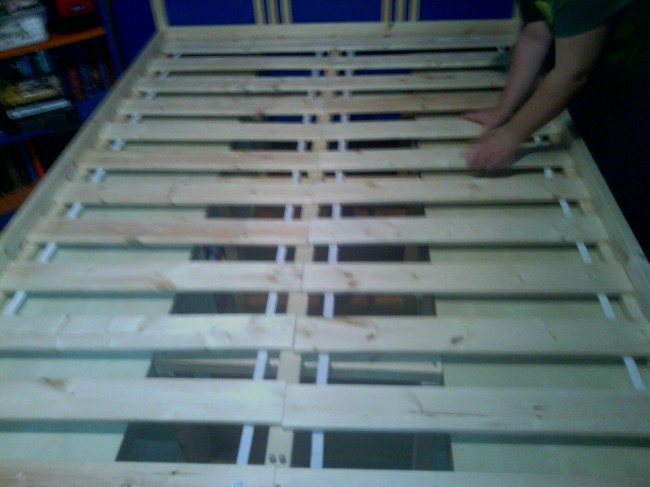
After that we added the Sultan Lade ikea planks to the bed that ikea suggests you buy with the bed for extra support.

Then after that it was smooth sailing.

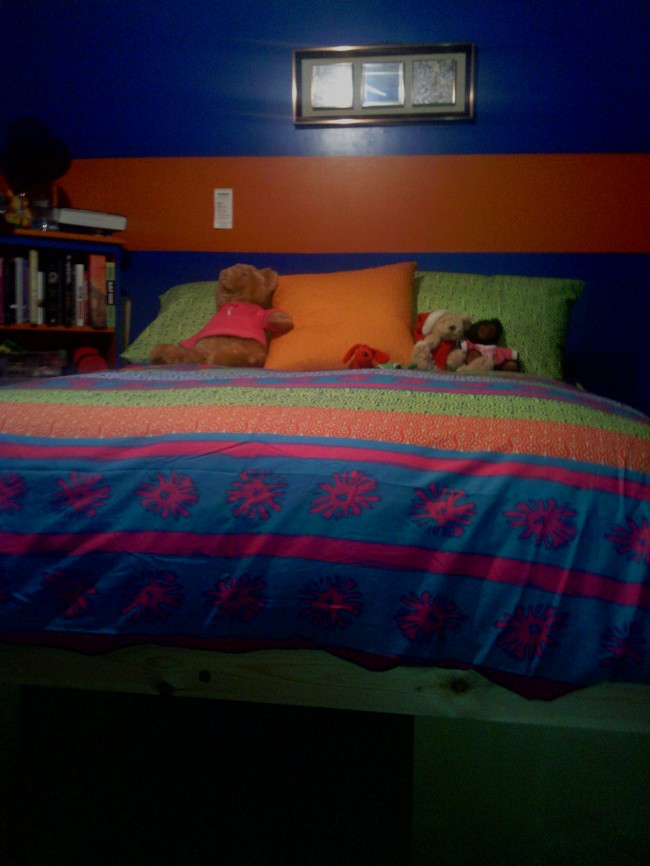
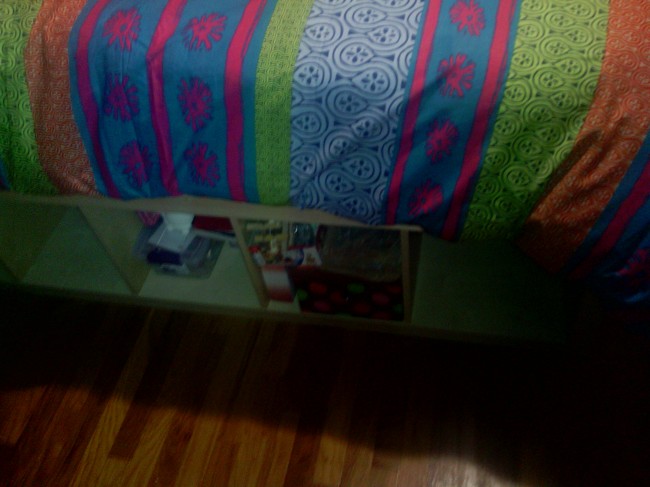
ImageImageImageImageImage

This is defiantly a winning project! It was easy enough and defiantly cost effective and totaled in to $200, without the mattress. If that is just about your price range you could do it for $170, and take out the Sultan Lade ikea planks because it works perfectly without them. There is enough storage with the five cubes and also in between the shelf’s under the bed. A standard sized Rubbermaid container fits underneath.

The frame is extremely sturdy and can hold two full sized adults, without breaking a sweat. My mom was most concerned about this. The only downside to this project I would say is that if this is used for a shorter person or an elderly person they will need a stepstool because it is rather high. In my house this is my “sisters” bed, but while we are away at college my 87 year old grandmother uses it and she needs a stepstool.

Otherwise I think this project is a huge success and I might be trying it sometime soon with a twin bed for me, if all goes well. =D

Until next time,

Emily